
Hey folks, Vince here from Mythopoeia. I'm one of the creators behind the comic series' Skies of Fire and Glow. I'm a history buff, and love to explore and discover more of the past - specifically WW2.
Last week, I got chance to go aboard the HMS Belfast, a British light cruiser that saw action during the war. Maintained in London by the Imperial War Museum, this has quickly become one of my favorite experiences in the city, and a must-see for anyone who is visiting!
I wanted to share some photos and cool stories I took away from my experience, in hopes of getting you to buy a ticket and experience the HMS Belfast for yourself. Though it's not as impressive as the carrier museums you can find in the US, it's still a ship with lots of character, and anyone can easily spend a leisurely afternoon aboard this awesome vessel.

THE HISTORY
The HMS Belfast finds its roots back in the early 30's when the British Admiralty were becoming increasingly worried of Japan's growing naval force. The Imperial Japanese Navy had just developed the Mogami-class ships, 11,200 ton vessels with 15 x 6-inch guns, which were capable of reaching up to 65km/hr. For Great Britain to maintain their superiority at sea, they needed something to match!
In comes the Town-class ships, the counterpoint that the admiralty hoped could challenge the rising menace. Among the 10 ships constructed in this class, the HMS Belfast would be the 9th and was ordered in 1936. On St. Patrick's Day 1938, Mrs Chamberlain (wife of the current British PM at the time) launches the ship in its hometown - Belfast.
Just a month before Great Britain enters the war in 1939, the HMS Belfast is commissioned into the Home Fleet under Captain G. A. Scott. Her early years in the Royal Navy weren't too eventful. She took part in naval exercises and was tasked with patrolling the northern waters, where the crew boarded numerous vessels for inspection. The most notable of these boardings was that of the disguised German vessel Cap Norte, where the Belfast crew captured hundreds of German reservists returning to the homeland from Brazil. In the later part of the year, the HMS Belfast struck a mine and was summarily decommissioned for repairs in 1940.
It would take two years before the HMS Belfast would return to service, but when she did in 1942, she came with updated armaments and radar systems. For the following two years, the ship and her crew partook in escort and blockade missions in northern Europe. This all culminated to the Battle of North Cape in 1943, where the ship played a significant role in sinking one of Germany's pride and joys - the Scharnhorst.
The following year, 1944, proved to be the most memorable for the HMS Belfast and her crew. In March, the ship participated in the bombing of Germany's other pride and joy - the Tirpitz - called Operation Tungsten. On June 6, the ship anchored off the coast of Normandy, where her crew worked tirelessly to shell German artillery positions during D-Day. A total of 1,996 rounds would be shot during the mission.
Once the allies were successfully pushing the frontlines beyond the reach of HMS Belfast's 6-inch guns, the ship was ordered east, where she would finally get the chance to challenge the Mogami-class ships that the Admiralty so feared. This, however, would not happen as the war ended just as the HMS Belfast entered Asian waters.
After WW2, the ship would watch over Asian waters in the latter half of the 40's, and later fought in the Korean War in support and patrolling roles. By the 60's, the ship was showing its age; and in 1963, the HMS Belfast was decommissioned and sent to the reserves.
Its future was uncertain, with the Navy unsure of how to repurpose the costly vessel. Luckily, in 1971, the HMS Belfast Trust was formed in hopes of maintaining the the ship as a floating museum. In 1978, the Imperial War Museum took over the task, and the ship has become a London landmark ever since.
THE SHIP
The overall experience of visiting this venerated ship was truly inspiring. I was lucky enough to go on a day where veterans of the ship were aboard and were happy to tell their stories and experiences aboard the ship. This was a big plus!
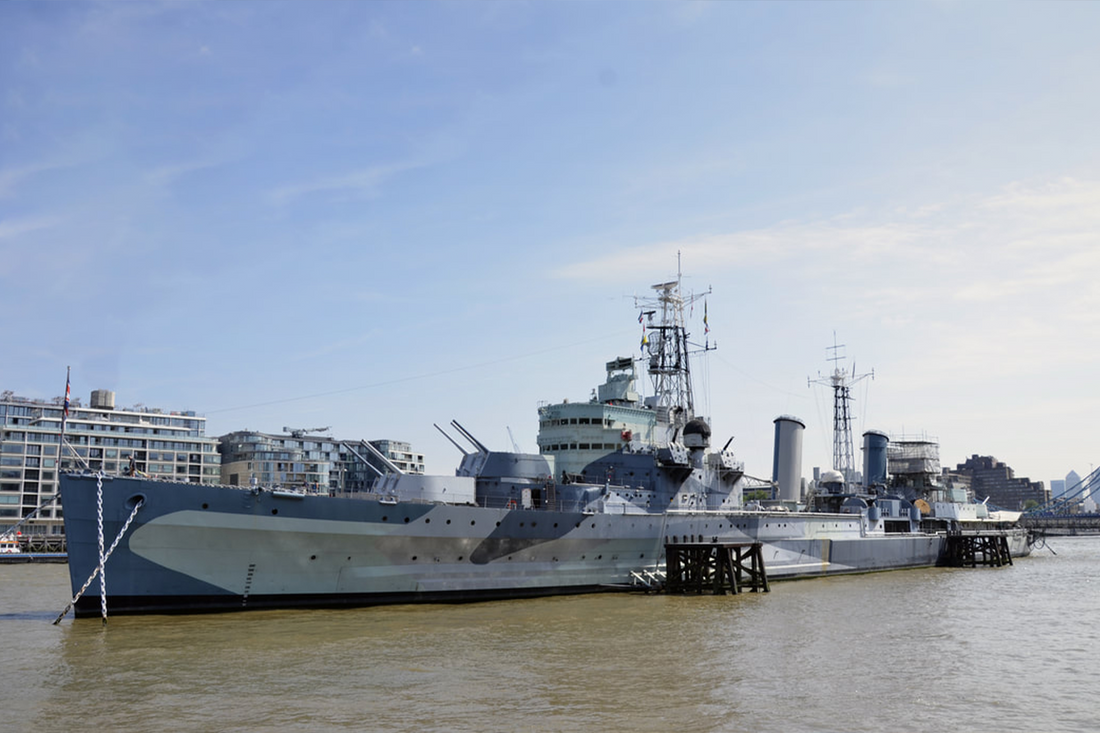
To board the ship, there is a long gangway that connects to the stern section of the HMS Belfast. From here, you can see the ship in all its glory. The beautiful camouflage pattern, officially called Admiralty Disruptive Camouflage Type 25 (how original -.-), is the same pattern painted on the ship during 1942-1944.
Reaching the ship's stern, there are a couple of interesting pieces strewn about deck. First, one's got to give props to whoever thought of converting a sea mine into a donations box. Ingenuity cranked up to 11 for this...

Mine!
In the walls there are multiple plaques commemorating those who served aboard the ship and those who made preservation of this piece of history possible. A large silver bell, given as a gift at launch, is permanently fixed in place. During the war, the Admiralty were worried the valuable bell might be lost if the ship were sunk, and kept the bell safely in storage back in England for the entire Second World War. One can only imagine how the crew must've felt when they heard this...
From here, the ship can be navigated through the many ladders and hatches that allow entry to the bridge and the lower decks. A total of 9 decks can be accessed, giving visitors and cross-section experience of life on the HMS Belfast. Be warned, there are lots of tight spaces and lots of climbing up and down steep ladders. At times, I nearly knocked myself out on low-hanging beams and narrow hatches.
Also, you might not want to touch most parts of the ship as Asbestos is still present underneath all the coats of paint...
KITCHEN AND HOSPITAL
One of the first places we came across was the kitchen and medical areas. The kitchen itself is massive, having to prepare breakfast, lunch, and dinner for over 800 people! Apparently, some 250 tons of bread would be eaten by the crew in just 1 year! Here, they'd prepare the many appropriately nicknamed dishes like Yellow Peril (smoked haddock), Schooner on the Rocks (roast beef on roasted potatoes), and Nelson's Blood (rum).
In the medical area, there is a surgery and bunk beds for injured personnel. There is also a dentist's room, where patients can go into get their teeth worked on.
STORES AND WORKSHOPS
Another impressive number is that the ship has some 40 stores and multiple workshops in order to maintain the ship (I saw 4 on my visit). These stores would give troops everything from candy, to uniforms, to the allotted 1/2 gill of rum each sailor would receive as their daily allowance.
These stores are strewn all over the ship and are a pleasant surprise when stumbled upon.

You might have a million problems, but please refrain from asking your D.O. about "family planning".
BOILER & ENGINE ROOMS
The boiler and engine rooms are probably one of the more impressive parts of the ship. You truly feel like you're in a steampunk universe. Spanning over three decks, they are a mess of gears, dials, engines and levers.
According to one of the veterans, you'd work a 4-hour shift in these rooms just because it would get so hot and stuffy. From down here, you'd still be able to hear the noise of the guns above and feel the ship list back and forth from their recoil.
6-INCH GUNS
Of course one cannot pass up the twelve 6-inch guns that sit on the HMS Belfast. These huge cannons could shoot at targets up to 14 miles away. There is much to see here as you can go down into one of the shell rooms and see the stores of ammunition on the carousel belt.
These shells were safely below the waterline and well armored. From here, the shells were hoisted up to the turrets where they can be fired.
The crew would aim using the Admiralty Fire Control Table, or "Clock" as one veteran called it. It's a primitive computer that calculated the necessary trajectory needed to hit a target. To calculate this, it would take into consideration the ship's speed, the enemy vessel's direction, and even the rotation of the earth! Some shells would take up to 90 seconds to reach their target, so such calculations were imperative to get a successful hit.
Two of the turrets are open for you to explore, one has an awesome "turret experience" where you get a chance to experience how it would've been like when one of these guns was fired. I'm pretty sure it isn't exactly accurate, but it did give me a scare nonetheless.

Inside one of the ship's turrets.
BRIDGE
The bridge is strangely spartan. It has windows, where the Captain and Navigator can look out and see the action, and multiple navigational dials and reads. There's also two seats bolted to the floor with "Captain" and "Navigator" written respectively on them. Surprisingly, there isn't a wheel. This is because the ship's direction was dictated by the captain and adjusted below, where it was safer from enemy fire.
There is a cool motorized map table at the back of the bridge, and the navigator's quarters as well. There are also some speaking tubes that connect to other parts of the ship. It's great to see that these were still utilized as a fail-safe way of communication, even when electrical phone systems were readily available at the time.
CREW MESS HALL
In the crew mess area, the museum has designed it to look like what it would've been during the ship's Northern convoy escorting days of WW2. Mannequins, dressed in appropriate attire, sit at tables and play cards; while others lie sleeping in hammocks hanging inches above their heads. It's a window into how cramped and close the crew must've been during missions.
In the bow section, where the anchor is housed, there's more space for sleeping quarters, and two windowless rooms. These were utilized as a brig for any unruly crew. Punishments were long stays in these cramped, bedless quarters, with only bread and water for sustenance.

These were just some of the many things and locations that really impressed me on the trip. There is, however, much more! I didn't mention the Admiral Deck, which was used by the Admiral and his personnel when the ship required it. There's also the Radar Room, CDC Room, and Radio Warfare Room. There's even a torpedo for show, giving some insight on the Belfast's other capabilities.
The adventure must end here, however. No point in spoiling everything! I hope you enjoyed the pictures and, if you're in town, be sure to stop by and see this iconic vessel for yourself!
- Vince
The adventure must end here, however. No point in spoiling everything! I hope you enjoyed the pictures and, if you're in town, be sure to stop by and see this iconic vessel for yourself!
- Vince